Google Chrome has become the most popular web browser used by people around the world. It offers a variety of features such as speed, security, and user-friendly interface, making it the go-to choice for many users. However, one issue that often comes up while using Chrome is high CPU usage. This can slow down your computer, drain its battery, and even cause it to become unresponsive. If you are facing this problem, don’t worry, you’re not alone. Fortunately, there are several ways to reduce Chrome’s high CPU usage and improve its performance. In this article, we will discuss six effective tips and tricks to help you solve this problem and enhance your browsing experience.

Understanding Chrome’s High CPU Usage:
Before we dive into the solutions, let’s first understand what causes high CPU usage in Chrome and the impact it can have on your computer.
What Causes High CPU Usage in Chrome?
High CPU usage in Chrome is mainly caused by multiple factors, such as poorly coded websites, extensions, plugins, and outdated software. When you open a website, Chrome uses your computer’s resources to load and render the page. If the website contains heavy animations, videos, or graphics, it can put a strain on your CPU, causing it to work harder and use more power. Similarly, poorly coded extensions and plugins can also consume significant amounts of CPU, even when you are not actively using them.
Impact of High CPU Usage on Your Computer
High CPU usage in Chrome can cause your computer to slow down, freeze, or crash. It can also drain your battery quickly, reducing its lifespan. In some cases, it can even overheat your system, leading to hardware damage. Moreover, if you are using an older or low-end computer, high CPU usage in Chrome can make it almost unusable, making it difficult for you to perform even simple tasks.
How to Check Chrome’s CPU Usage
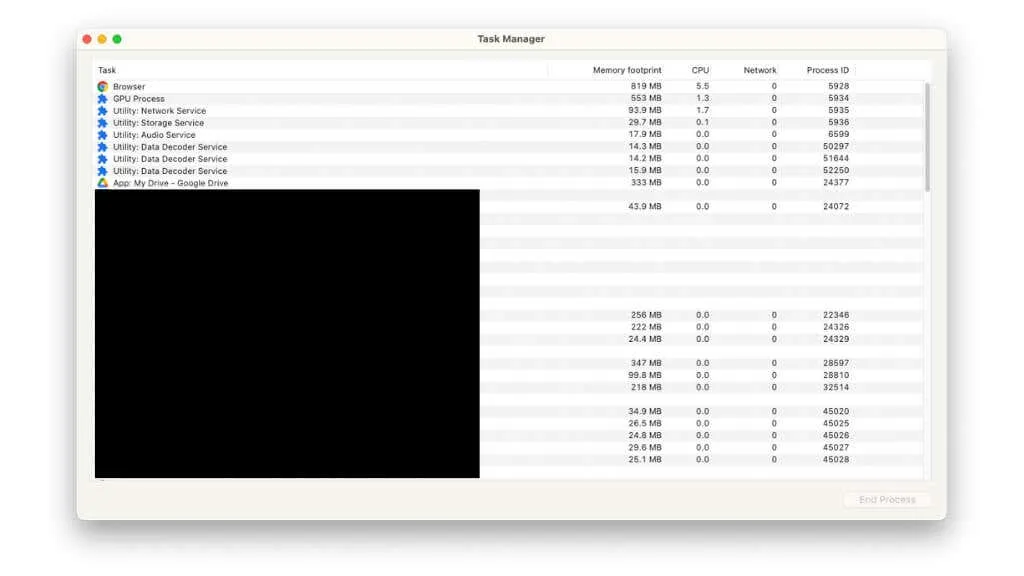
To check Chrome’s CPU usage, you can use the built-in task manager. This will show you which tabs, extensions, and plugins are consuming the most CPU, allowing you to troubleshoot the problem effectively. To access the task manager, simply right-click on the title bar of Chrome and select “Task Manager.” Alternatively, you can use the shortcut “Shift + Esc” on Windows and “Command + Option + Esc” on Mac.
Disable Unnecessary Extensions and Plugins:
Extensions and plugins are small programs that add extra features and functionality to your browser. While they can be useful, having too many extensions and plugins can significantly increase Chrome’s CPU usage. Therefore, it is essential to identify the problematic ones and disable or remove them.
Identifying Problematic Extensions and Plugins
The first step is to identify the extensions and plugins that are causing high CPU usage in Chrome. To do this, open the task manager and check the CPU column. Anything using more than 5% CPU is considered to be consuming a significant amount of your system’s resources. If you notice an extension or plugin using a lot of CPU even when you are not actively using it, it might be causing the problem.
Disabling or Removing Extensions
To disable an extension, click on the three dots on the top-right corner of Chrome and select “More Tools” > “Extensions.” Here, you will see a list of all the installed extensions. Simply toggle off the ones you don’t need. If you want to remove an extension completely, click on the “Remove” button next to it. Keep in mind that some extensions might require you to restart Chrome before they are fully removed.
Managing Plugins in Chrome
Plugins are small programs that help you play videos, games, and other multimedia content in your browser. However, they can also consume a significant amount of CPU if not managed properly. To manage plugins in Chrome, type “chrome://plugins/” in the address bar and press Enter. Here, you can enable or disable plugins as per your requirement. It is recommended to only enable the essential plugins and disable the rest to reduce Chrome’s CPU usage.
Clearing Cache and Cookies:
Cache and cookies are temporary files stored by your browser to improve the loading speed of websites you frequently visit. However, over time, these files can accumulate and become outdated, causing them to take up unnecessary space and slow down your browser. Therefore, it is crucial to clear them regularly to reduce Chrome’s high CPU usage.
Why Clearing Cache and Cookies Helps
Clearing cache and cookies helps in reducing Chrome’s high CPU usage because it removes the temporary files, freeing up space and resources for the browser to use. This makes it easier for Chrome to load and render web pages, reducing its overall CPU usage. Moreover, clearing cache and cookies can also help in fixing website loading issues and improve your browsing experience.
How to Clear Cache and Cookies in Chrome
To clear cache and cookies in Chrome, click on the three dots on the top-right corner and select “More Tools” > “Clear Browsing Data.” Here, you can choose the time range for which you want to clear the data. It is recommended to select “All Time” to ensure all outdated files are removed. You can also select what type of data you want to delete, such as history, cookies, cache, etc. Once you have made your selections, click on “Clear Data” to remove them from your browser.
Scheduling Automatic Cleaning
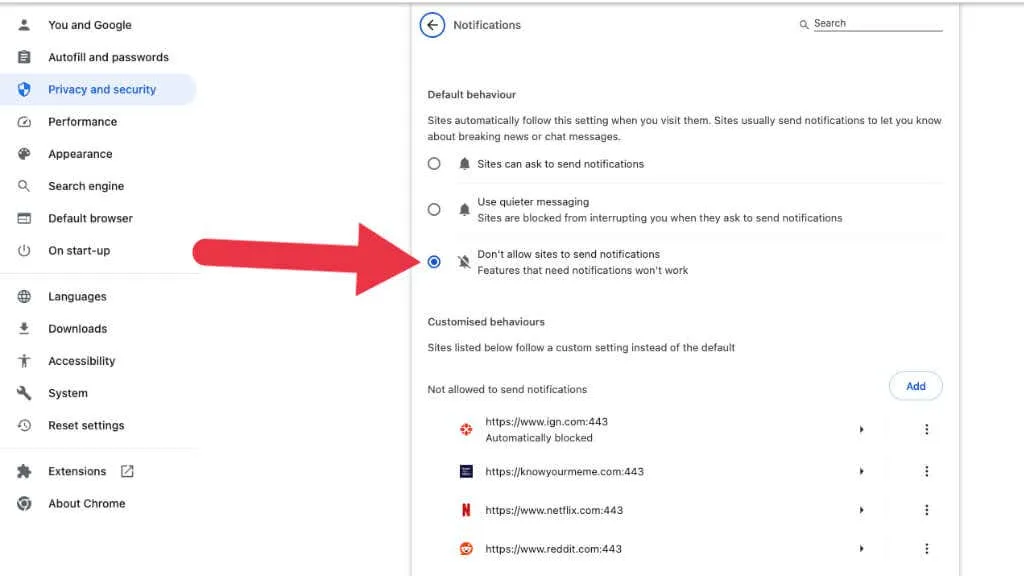
If you don’t want to manually clear cache and cookies regularly, you can schedule automatic cleaning in Chrome. To do this, go to “Settings” > “Privacy and Security” > “Clear Browsing Data.” Here, click on “Advanced” and select the time range for which you want to clean the data. Then, check the box next to “Cookies and other site data” and “Cached images and files.” Finally, click on “On exit” and then “Add” to enable automatic cleaning.
Enabling Hardware Acceleration:
Hardware acceleration is a feature in Chrome that uses your computer’s GPU to offload some of the rendering tasks from the CPU. This helps in reducing Chrome’s high CPU usage and improves its overall performance. However, this feature may not work correctly on all systems, so it is essential to troubleshoot any issues that may arise after enabling it.
What is Hardware Acceleration?
Hardware acceleration is a technology that allows certain tasks to be performed by dedicated hardware instead of relying solely on the CPU. In Chrome, enabling hardware acceleration means using your computer’s graphics processing unit (GPU) to load and render web pages, reducing the workload on the CPU. This can help in reducing Chrome’s high CPU usage significantly.
How to Enable it in Chrome
To enable hardware acceleration in Chrome, click on the three dots on the top-right corner and go to “Settings” > “Advanced” > “System.” Here, you will find the option to enable or disable hardware acceleration. Simply toggle it on, and you’re good to go. If you are experiencing any issues after enabling hardware acceleration, you can disable it by following the same steps.
Troubleshooting Hardware Acceleration Issues
If you notice any problems with Chrome after enabling hardware acceleration, you can try updating your GPU drivers. Make sure you have the latest drivers installed for your graphics card. You can also try disabling other settings in Chrome that may interfere with hardware acceleration, such as using a dark mode theme or custom scaling. Additionally, make sure your computer meets the minimum system requirements for hardware acceleration to work correctly.
Updating Chrome and Drivers:
Another effective way to reduce Chrome’s high CPU usage is by keeping it and your system drivers up to date. Updates usually contain bug fixes and performance improvements that can help in decreasing Chrome’s resource usage. Therefore, it is essential to regularly check for updates and install them.
Importance of Updates
Updates are crucial for maintaining the smooth functioning of your system and its applications. They not only fix known issues but also add new features and enhance security. Therefore, it is recommended to keep Chrome and other software up to date to ensure maximum performance and stability.
How to Update Chrome
To update Chrome, click on the three dots on the top-right corner and select “Help” > “About Google Chrome.” Here, Chrome will automatically check for updates and install them if they are available. You can also manually check for updates by clicking on “Update” next to the version number of Chrome.
Updating Your System Drivers
Updating your system drivers, especially the ones related to your graphics card, can also help in reducing Chrome’s high CPU usage. To update your drivers, go to your computer manufacturer’s website or the website of the hardware manufacturer and download the latest drivers for your system. Make sure you select the correct drivers for your operating system.
Other Effective Tips and Tricks:
Apart from the methods mentioned above, there are a few other tips and tricks that can help in reducing Chrome’s high CPU usage.
Using Chrome Task Manager
We have already discussed how the task manager can help in identifying problematic tabs, extensions, and plugins in Chrome. However, you can also use it to end any unresponsive processes that may be consuming excessive amounts of CPU. Simply right-click on the process and select “End Process.” This will close the tab or extension and free up resources.
Using an Ad Blocker
Ads not only slow down web pages but can also consume significant amounts of CPU, especially if they are animated or contain large images. Therefore, using an ad blocker can help in reducing Chrome’s high CPU usage. There are various ad blockers available as extensions for Chrome, such as Adblock Plus, uBlock Origin, etc.
Adjusting Chrome’s Settings
Changing a few settings in Chrome can also help in reducing its high CPU usage. For example, disabling the “Continue running background apps when Google Chrome is closed” option can free up resources when you close Chrome. You can find this setting by going to “Settings” > “Advanced” > “System.” Additionally, you can also try enabling the “Use hardware acceleration when available” option under “Settings” > “Advanced” > “System.”
Conclusion:
In conclusion, high CPU usage in Chrome can be frustrating and hinder your browsing experience. However, with the tips and tricks mentioned above, you can effectively reduce Chrome’s high CPU usage and improve its performance. It is essential to regularly update Chrome and your system drivers, disable unnecessary extensions and plugins, clear cache and cookies, and enable hardware acceleration to ensure smooth browsing. Additionally, using ad blockers and adjusting Chrome’s settings can also help in reducing its resource usage. By following these simple steps, you can enhance your browsing experience and make the most out of Google Chrome.